
User manual
Formulate, balance and produce ice cream and sorbet with technical precision. This guide walks you through the app screen by screen, exactly as it is today.
Home — Your control center
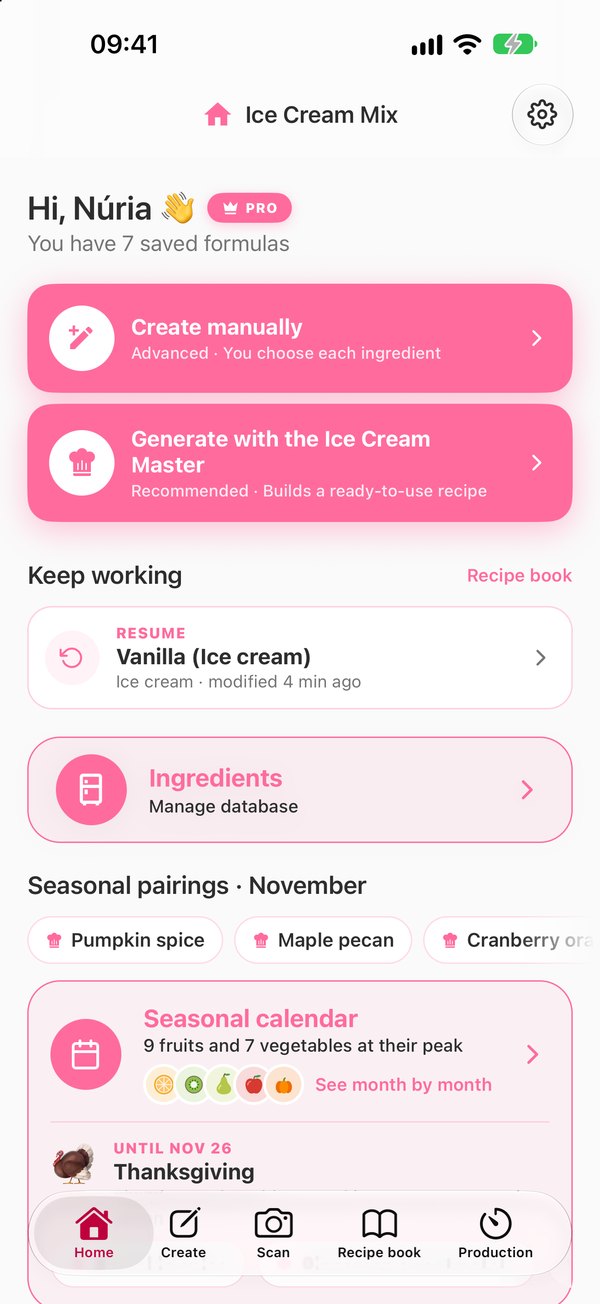
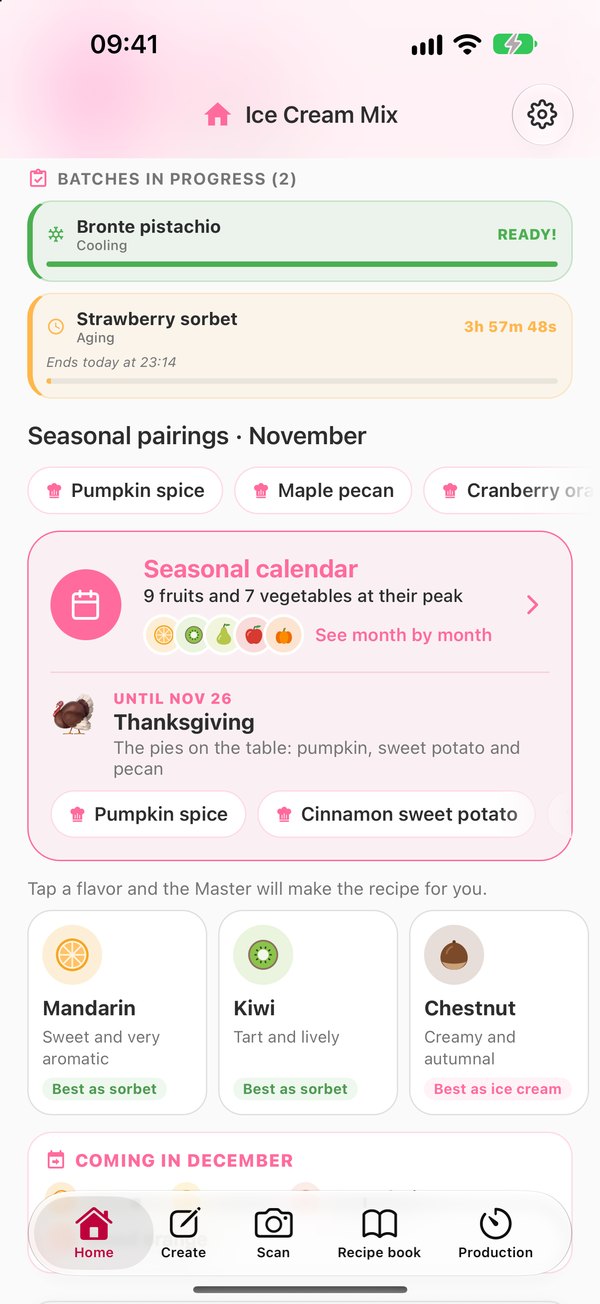
The Home screen brings together what you use most: creating a recipe, picking up the last one you worked on, the batches you have in production and what's in season this month.
The tab bar
Five tabs take you to each part of the app. On iOS 26 or later, the bar is made of glass (Liquid Glass); on earlier versions, it's the standard system bar.
- Home: your overview, what's in season and the way into Settings (the gear at the top right).
- Create: start a recipe from scratch, with the Ice Cream Master or from a base that's already balanced.
- Scan: turn a photo of a recipe into an editable formula.
- Recipe book: all your saved recipes.
- Production: your batches in progress, their timers and the Workshop. A red badge flags finished stages you haven't dealt with yet.
What's on Home
- Greeting and plan. “Hi, {your name}” with your plan next to it: PRO, or Free plan with the “GO PRO” button. Below it, how many formulas you have saved. The first time, the app asks for your name.
- Create manually and Generate with the Ice Cream Master. On the free plan, their subtitle tells you how many you have left (“2 free left”) or shows “Limit reached (3/3)”.
- Keep working. The last thing you worked on: “Resume” opens that recipe's page and “Continue draft” takes you back to the editor right where you left off.
- Ingredients. A shortcut to your ingredient database.
- Batches in progress. Each batch with its stage, countdown, the time it ends and a progress bar. Tap it to go to its recipe.
- User manual. This guide, without leaving the app.
- Master's tip. A technical tip every time you open the app. Tap for another one, or swipe to see earlier ones.
In season
Every month, Home suggests what's at its best:
- Seasonal pairings (“Pumpkin spice”, “Maple pecan”, “Cranberry orange”…). A ✓ means you already have that recipe.
- Seasonal calendar: how many fruits and vegetables are at their peak, with the “See month by month” link.
- Holidays as they approach (Valentine's Day, St. Patrick's Day, Easter, Mother's Day, Fourth of July, National Ice Cream Month in July, Halloween, Thanksgiving and Christmas), with their classic flavors.
- In season: “Tap a flavor and the Master will make the recipe for you.” Each card tells you whether it's best as ice cream or as sorbet. Tapping it opens the Master with the flavor and type already chosen. If you already have that recipe, you can open it or create another one.
- “Coming in {next month}”: what comes into season next month.
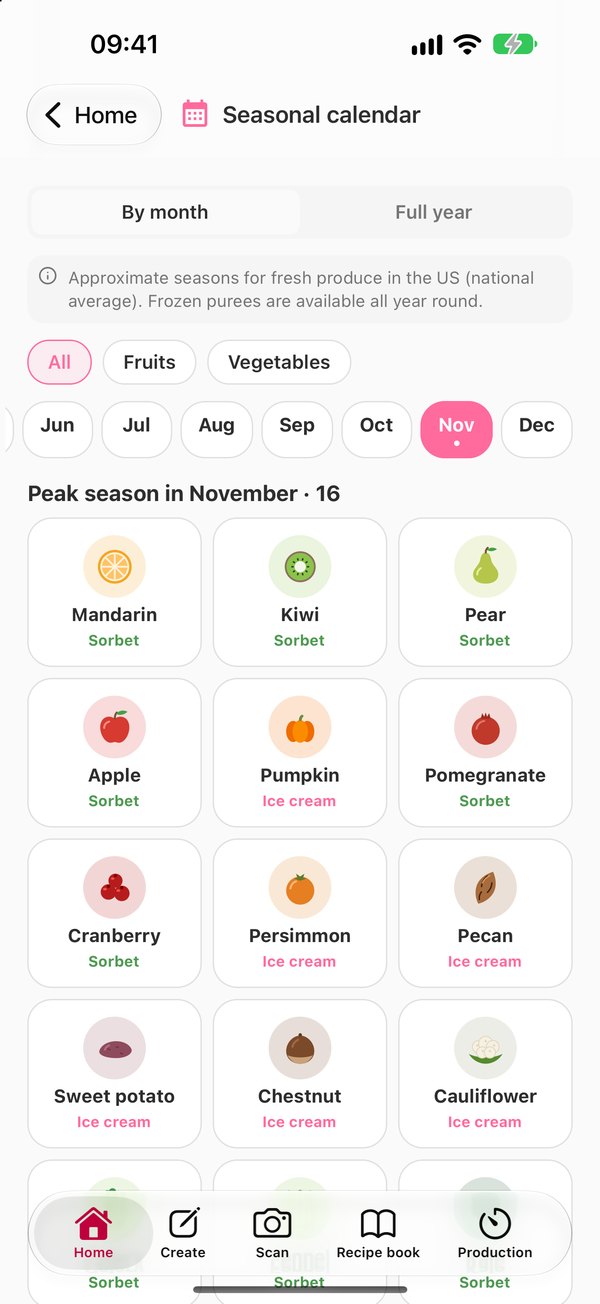
In the Seasonal calendar you can view it “By month” or “Full year” and filter by fruits or vegetables. Tap an ingredient to see its months, whether it works better as ice cream or sorbet, the “Create with the Master” button and your recipes that already use it. The dates are an approximate national average for fresh produce in the US; frozen purees are available all year round. To use another country's calendar, go to Settings › Seasonal calendar.
On iPad and iPhone Duo
On iPad, and on the iPhone Duo when it's unfolded, the app uses the whole screen. Home switches to two columns, with “Your recipes” (your six latest, with their serving method and temperature) and the season side by side. The recipe page shows the balance next to the ingredients, and the recipe book, ingredients and production appear as a grid.
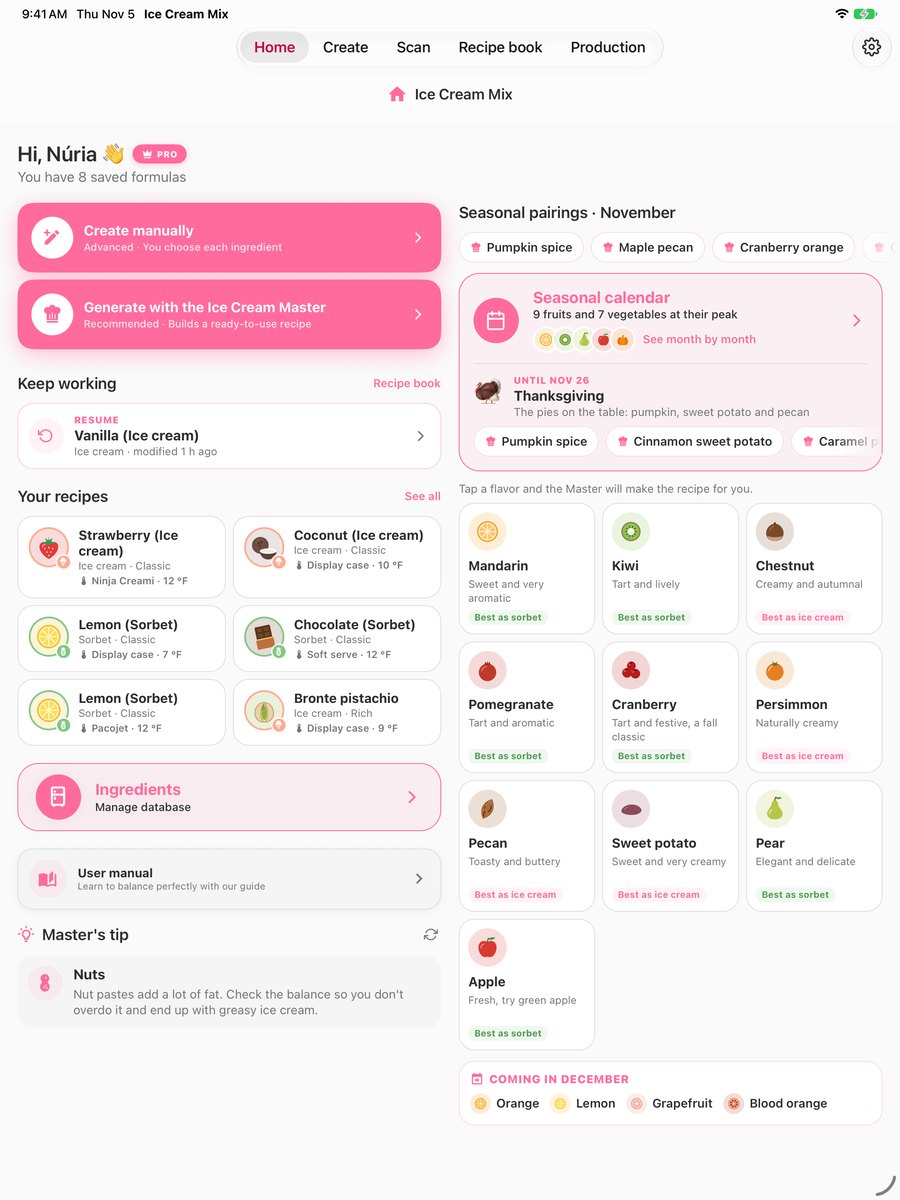
Home on iPad.
1. Create a recipe
In the Create tab you choose how to start:
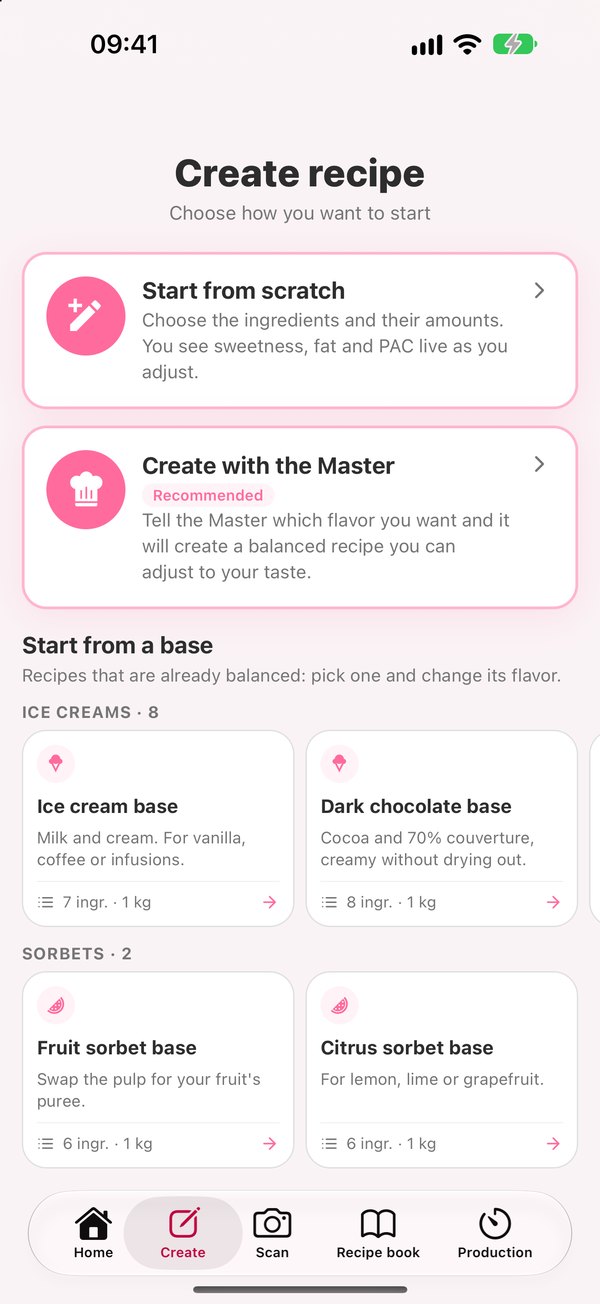
- Start from scratch. You choose the ingredients and their amounts and see sweetness, fat and PAC live as you adjust.
- Create with the Master (recommended). Tell it the flavor and the Master creates a balanced recipe you can then fine-tune.
- Start from a base. Recipes that are already balanced (8 ice creams and 2 sorbets): pick one, check its page and tap “Use this base” to change its flavor. The display-case bases are designed for −12 °C (10 °F), the home base is designed for the freezer (−18 °C / 0 °F) and the savory base loads with the Savory style.
- Continue a draft. Your three latest unfinished drafts.
On the free plan, each card shows how many recipes you have left, and at the bottom you'll see a summary: “Free plan: you have X of 3 from scratch, Y of 3 with the Master and Z of 3 scans left.”
The wizard: 4 steps
Whether you start from scratch or with the Master, a four-step wizard lays the foundations of the recipe. At the top you see “Step X of 4”; tap ‹ to go back a step without losing what you chose. Each option comes with an explanation and a “Show parameters” drop-down with the values the app will use.
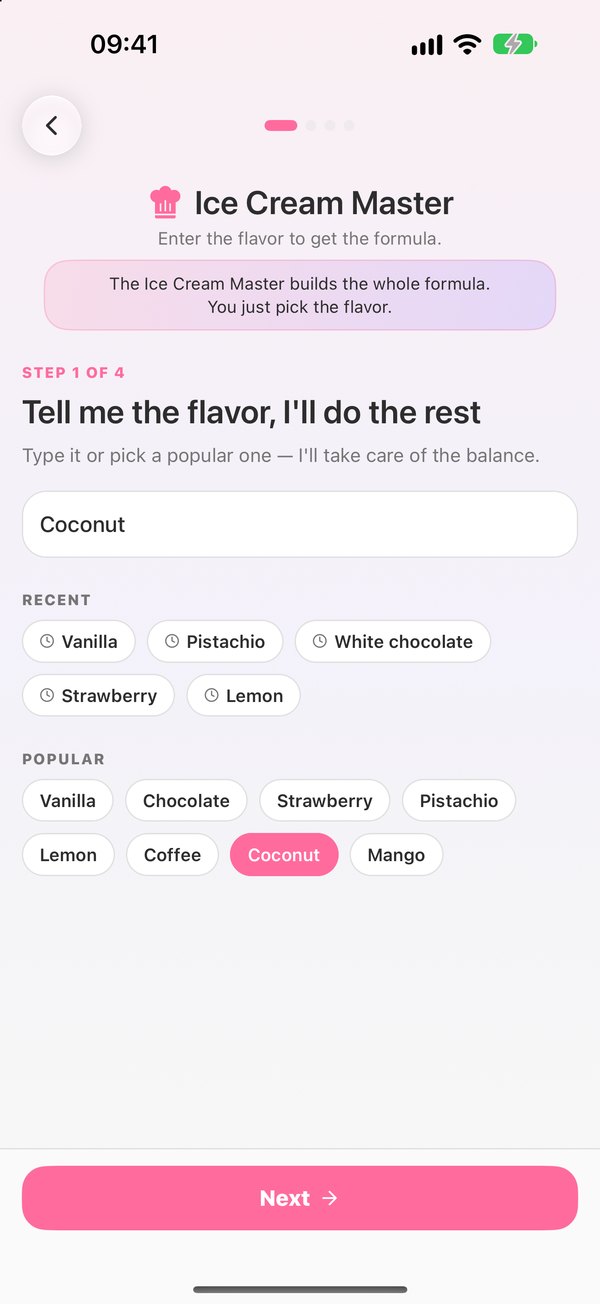
- The flavor. Type the flavor or the recipe name (“E.g., vanilla, strawberry, pistachio…”). Autocomplete searches the whole ingredient database, doesn't mind missing accents and tolerates typos. Below it you have “Recent” and “Popular” chips. If you're starting from scratch and pick a suggestion, that ingredient goes straight into the recipe at its recommended dose.
- Ice cream or sorbet? “Ice cream (dairy)”, with milk, cream and milk solids; or “Sorbet (water)”, just fruit and water, no dairy. The base sets the whole balance.
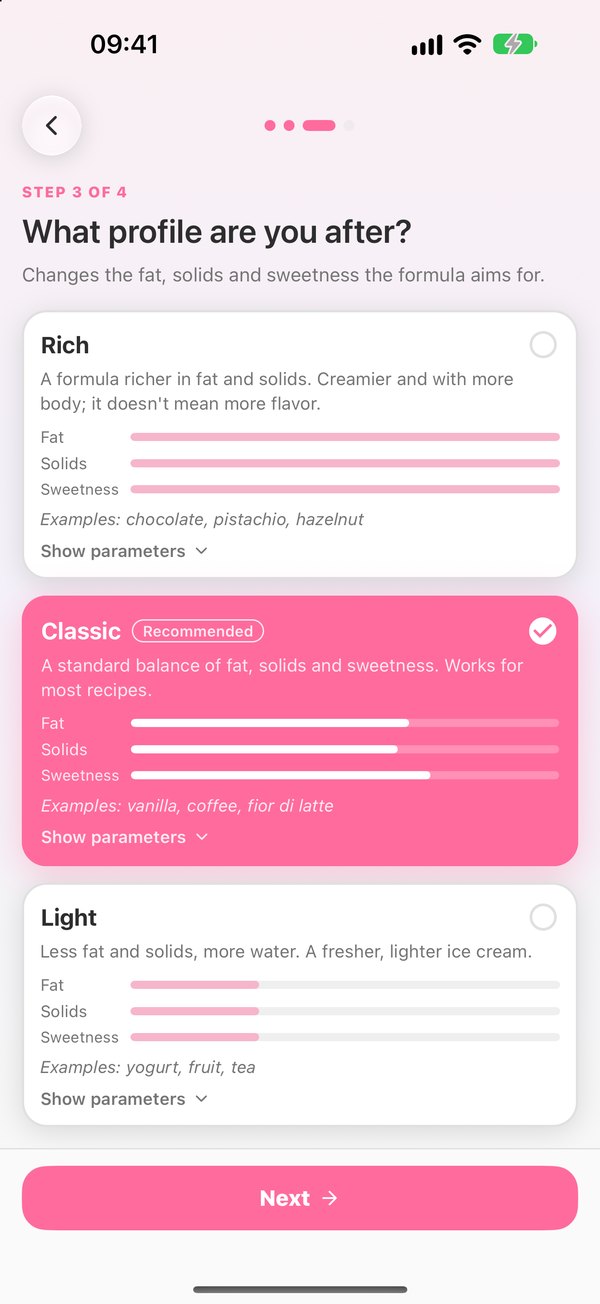
- What profile are you after? Rich, Classic (recommended) or Light. The profile changes the fat, solids and sweetness the formula aims for; it doesn't mean more or less flavor. Animated bars compare the three profiles.
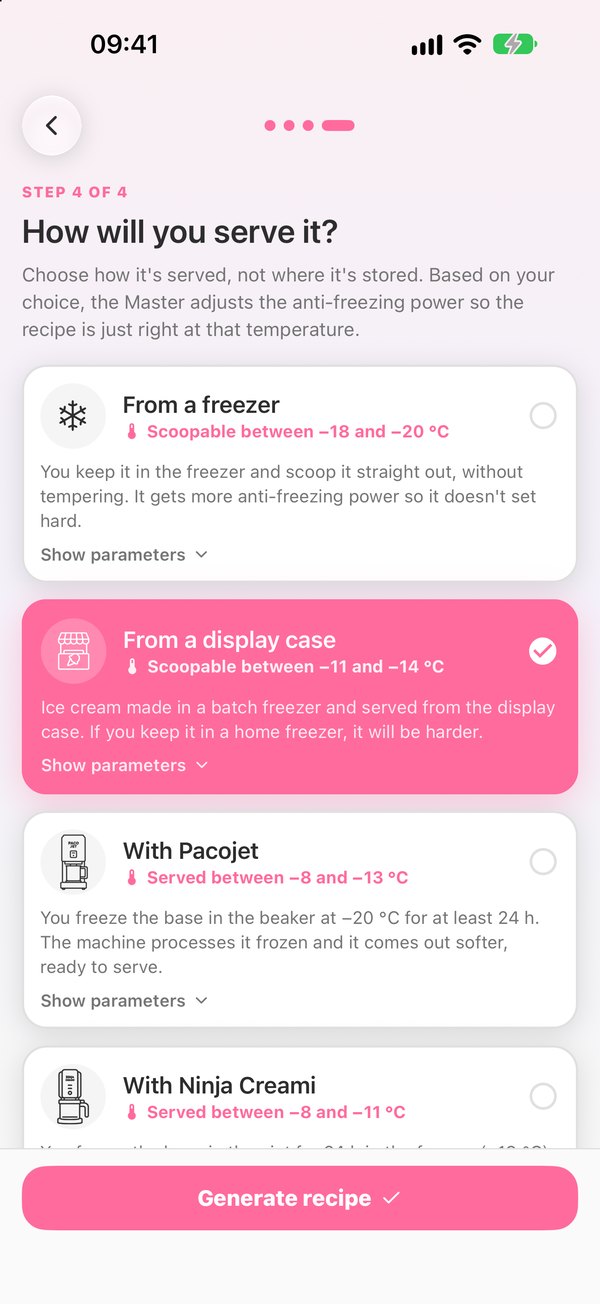
- How will you serve it? Choose how it's served, not where it's stored. Based on your choice, the app adjusts the anti-freezing power (PAC) so the recipe is just right at that temperature.
When you're done, tap Start (from scratch) or Generate recipe (Master).
The profiles
More fat and solids: creamier, with more body. In sorbet, more solids and sweetness. E.g., chocolate, pistachio, hazelnut; mango or banana sorbet.
A standard balance of fat, solids and sweetness. Works for most recipes. E.g., vanilla, coffee, fior di latte; strawberry or raspberry sorbet.
Less fat and solids, more water: fresher and lighter. E.g., yogurt, fruit, tea; lemon, lime or grapefruit sorbet.
If the flavor is fish or seafood, the app treats it as Savory, with its own ranges (very low sweetness).
Serving methods
| Serving method | How it's made | Ice cream | Sorbet |
|---|---|---|---|
| From a freezer | You keep it in the freezer and scoop it straight out, without tempering. It gets more anti-freezing power so it doesn't set hard. | −18 to −20 °C (0 to −4 °F) | −18 to −20 °C (0 to −4 °F) |
| From a display case | Made in a batch freezer and served from the display case. | −11 to −14 °C (12 to 7 °F) | −13 to −16 °C (9 to 3 °F) |
| With Pacojet | You freeze the base in the beaker at −20 °C (−4 °F) for at least 24 h; the machine processes it frozen. | −8 to −13 °C (18 to 9 °F) | −9 to −14 °C (16 to 7 °F) |
| With Ninja Creami | You freeze the base in the pint for 24 h at −18 °C (0 °F); the machine processes it frozen. | −8 to −11 °C (18 to 12 °F) | −9 to −12 °C (16 to 10 °F) |
| From a soft-serve machine | The machine freezes, whips and dispenses the mix soft, right away. It needs less anti-freezing power than the display case. | −6 to −8 °C (21 to 18 °F) | −6 to −8 °C (21 to 18 °F) |
These are serving temperatures (Temp). The colder a recipe is served, the more anti-freezing power (PAC) it needs so it doesn't set hard.
Recommended ranges
These are the ranges the app uses to evaluate the balance for each type and profile. The PAC in the table is for the display case: other serving methods change it (higher for the freezer, lower for Pacojet, Ninja Creami and soft serve).
| Parameter | ICE CREAM (dairy base) | SORBET (water base) | ||||
|---|---|---|---|---|---|---|
| Rich | Classic | Light | Rich | Classic | Light | |
| POD (sweetness) | 16 – 19 | 15 – 17 | 13 – 15 | 25 – 28 | 22 – 25 | 20 – 22 |
| PAC (anti-freezing) · display case | 240 – 280 | 230 – 270 | 220 – 260 | 340 – 380 | 320 – 360 | 300 – 340 |
| Fat | 12 – 16% | 8 – 12% | 4 – 8% | — | — | — |
| MSNF (milk solids) | 10 – 12% | 8 – 10% | 6 – 8% | — | — | — |
| TS (total solids) | 38 – 42% | 35 – 38% | 32 – 35% | 30 – 32% | 28 – 30% | 26 – 28% |
| Water (H₂O) | 58 – 62% | 60 – 63% | 63 – 66% | 68 – 72% | 70 – 73% | 72 – 75% |
PAC by serving method for ice cream: freezer 250–420, Pacojet 160–280, Ninja Creami 160–240 and soft serve 190–230 (for sorbet, 290–460, 220–340, 220–300 and 250–300). For soft serve, the recipe also uses its own profile: ice cream with POD 15–18, fat 6–9%, MSNF 10.5–12.5%, TS 33–38% and water 62–67%.
2. The recipe editor
The app's lab. It opens full screen so you can focus on the recipe: this is where you adjust every gram and see the technical balance instantly.
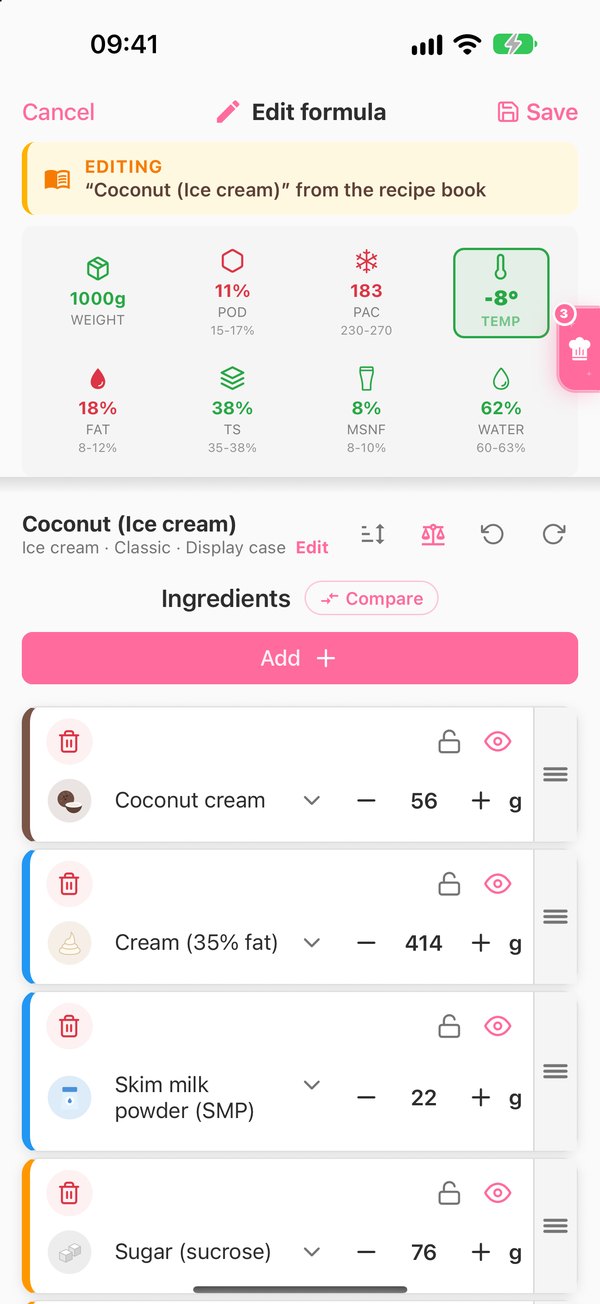
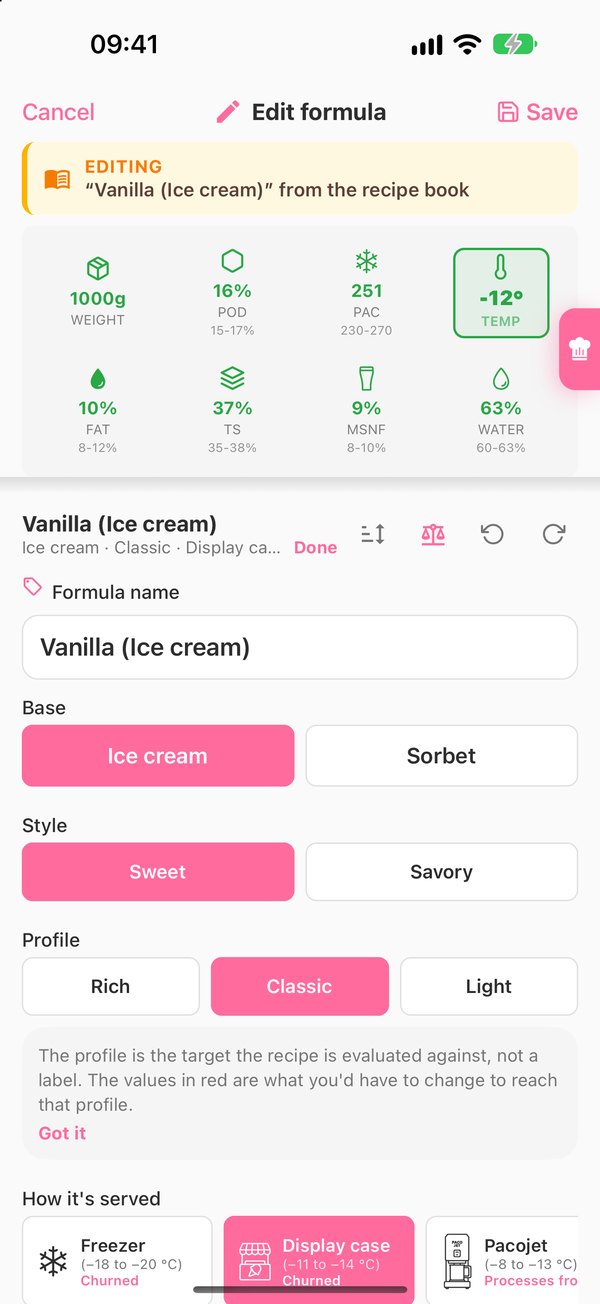
Create or edit
- New formula: saving creates a new recipe in the recipe book.
- Edit formula: a yellow “EDITING” banner with the recipe name reminds you that changes are saved over the original.
- If you leave with unsaved changes, the app asks: “Save as a draft?” for a new recipe or “Save changes?” when editing. If the app goes into the background, your recipe is saved as a draft automatically.
Recipe options
The first row sums up the recipe (“Ice cream · Classic · Display case”). Tap “Edit” to change:
- Formula name.
- Base: Ice cream or Sorbet.
- Style: Sweet or Savory (detected automatically if the recipe contains fish or seafood).
- Profile: Rich, Classic or Light. The “Best fit” tag shows which profile suits your recipe best as it stands.
- How it's served: Freezer, Display case, Pacojet, Ninja Creami or Soft serve, with its temperature.
The totals box
Eight tiles that recalculate with every gram. Each shows its range underneath and a color: green when it's in range, amber when it's close to the edge and red when it's out of range. Tap any tile to see what it means, its absolute total and its recommended range.
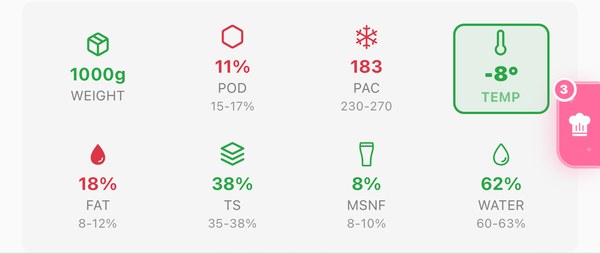
Green in range, red out of range. The serving temperature (Temp) is highlighted.
How sweet the mix is. Low: bland. High: cloying.
Controls hardness at serving temperature. Low: hard. High: soft. Includes lactose.
The estimated temperature at which the recipe is just right. Shown in °C or °F, depending on Settings › Temperature.
Creaminess and body; it carries the flavors.
Everything that isn't water. Keeps ice crystals in check.
Proteins and lactose: structure and air. Also known as serum solids.
Free water. Too much gives a watery texture.
The recipe total. Formulating at 1,000 g is recommended (it shows in green).
Action bar
- Sort ingredients: sort by amount, or put dairy, sugars, fats or fruit first.
- Scale to 1000 g: rescales the recipe to exactly 1 kg.
- Undo / Redo: up to 50 steps.
- Compare and Add an ingredient.
The ingredient card
- Select ingredient: the picker has a search bar, category filters, the Favorites and Custom filters and a counter of catalog and custom ingredients. Star the ones you use most. When searching, the return key closes the keyboard.
- − amount +: how much each tap adds is set in Settings › Recipe editing (1 g, 5 g or another value).
- Eye: opens the ingredient's full page. On the free plan, opening a catalog ingredient uses one of your 50 free lookups (opening it again doesn't).
- Lock: locks the ingredient.
- ≡ handle: press and hold, then drag to reorder.
- Trash: removes the ingredient (it asks you to confirm).
Master suggestions
Once the recipe has at least three ingredients, a side tab with the Master's hat and a counter appears. Open it to see what's worth fixing.
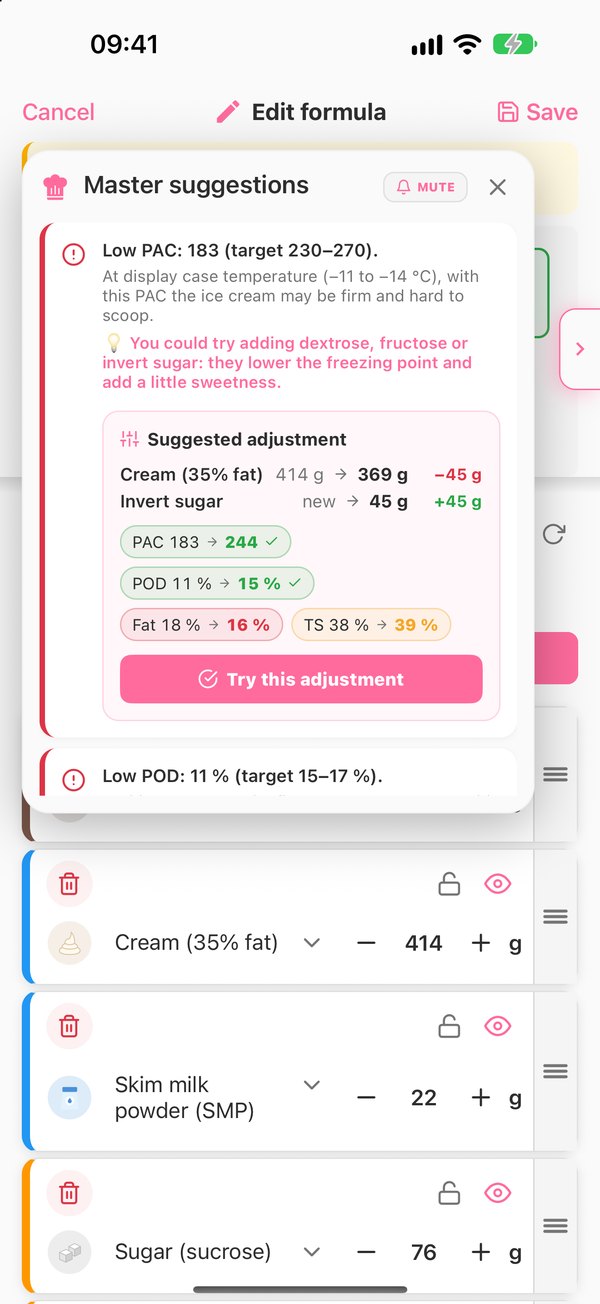
If a parameter is out of range, the Master works out a suggested adjustment: which ingredient to change, from how many grams to how many, and how it affects each parameter. Tap “Try this adjustment” to apply it (the recipe goes back to 1,000 g); if you don't like it, undo it. When everything is in range, you'll see “Balanced formula”. More details in Master suggestions.
Additional information
At the bottom of the editor you can add a short Description and your process Notes.
3. The Ice Cream Master
The Ice Cream Master builds a balanced 1,000 g recipe for you from a flavor. It works on your iPhone, with no internet connection, using the app's ingredient database and spec sheets.
How to use it
- In Create, tap Create with the Master (or “Generate with the Ice Cream Master” on Home, or a seasonal flavor).
- “Tell me the flavor, I'll do the rest”: type it or pick one of the “Recent” or “Popular” chips. Autocomplete suggests specific ingredients from the database, including professional purees and pastes and your custom ingredients.
- Choose ice cream or sorbet, the profile and how you'll serve it.
- Tap Generate recipe. In a few seconds the Master looks up the ingredient, checks the spec sheets and balances PAC and POD. The recipe is saved and shows up first in your Recipe book.

What the Master does
- Automatic balancing of sugars, fat and solids for the type, profile and serving method you chose.
- A professional sugar blend: it starts from sucrose and adds dextrose or other sugars depending on the anti-freezing power the serving method calls for. In Classic it may add glucose, and in the richer profiles it alternates between a traditional Italian style (with invert sugar) and a modern style (with glycerin). The recipe notes tell you which one it used and why.
- Careful with alcohol: if the flavor includes a liqueur, it uses 30 g per kg and cuts back if that would add too much anti-freezing power. The notes remind you to serve it at its temperature.
- Common sense: it won't let you make a sorbet from a flavor that contains milk, and if it can't find the ingredient, it offers to create it.
- Learns from you: when you edit and save a recipe from the Master, it adapts its next recipes to your style (by ±15% at most). You can start over in Settings › Ice Cream Master › “Reset the Master's style”.
On the free plan you get 3 Ice Cream Master recipes. With PRO they're unlimited. Once you've used all 3, you can still set up the recipe step by step: at the end, “Generate with PRO” opens the plans and, if you subscribe, the recipe is generated right away with what you chose.
4. Scan a recipe
Turn a photo of a recipe (from a book, a notebook or a recipe card) into an editable formula with all its parameters calculated.
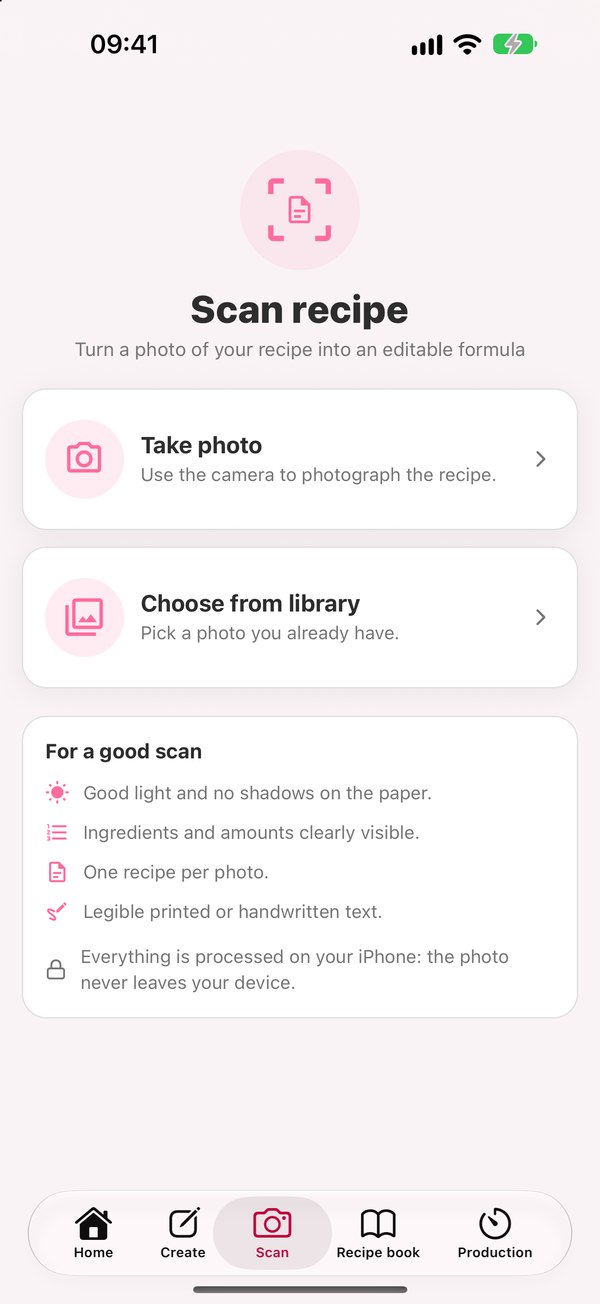
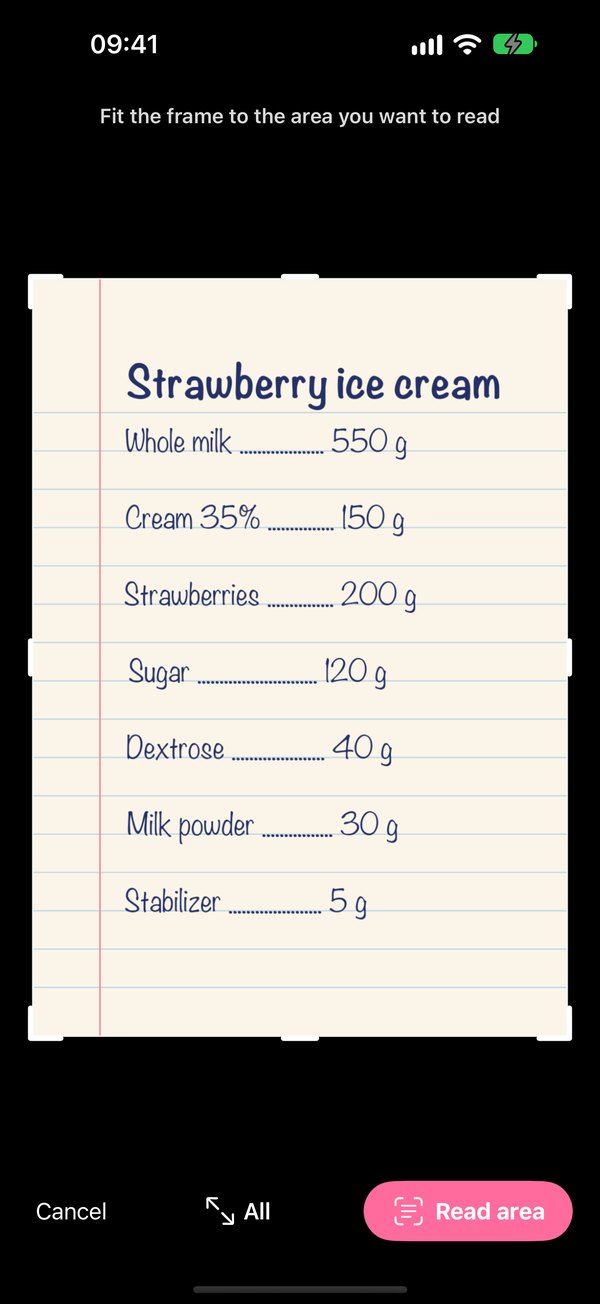
- In the Scan tab, tap Take photo or Choose from library.
- Fit the frame to the part you want to read and tap Read area (or All to read the whole photo).
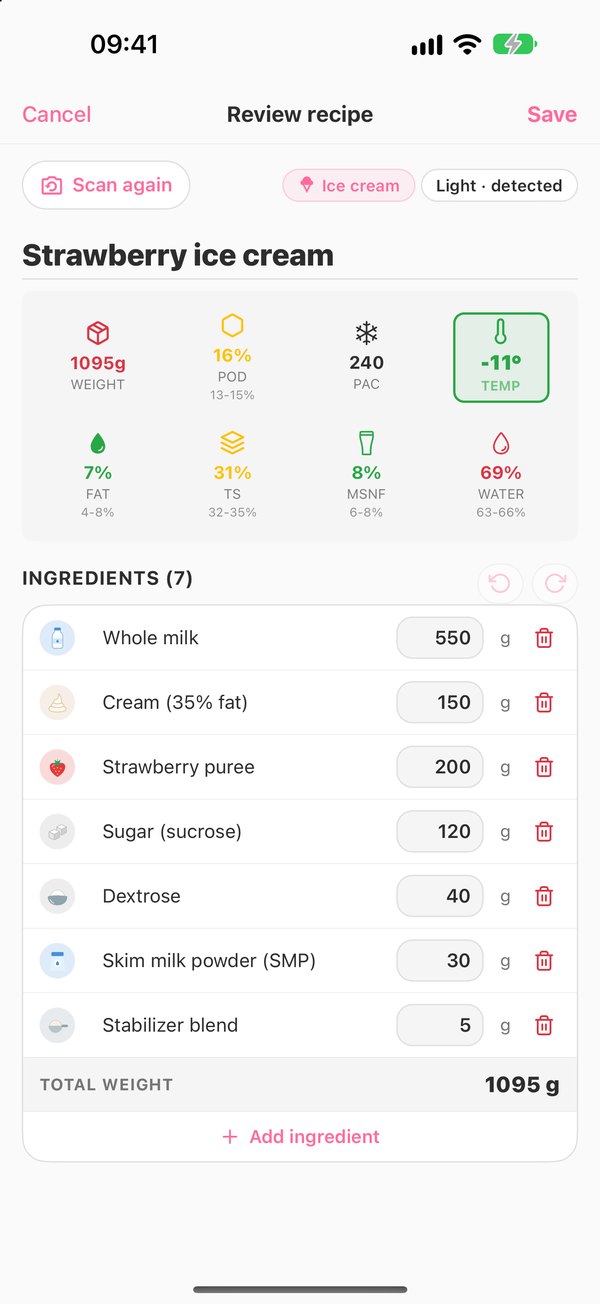
- The app reads the recipe: you'll see it recognize the text, the ingredients and the amounts, and calculate PAC, POD, fat and TS. If the photo has several recipes, it asks which one to import.
- Review the recipe. At the top you see whether it's ice cream or sorbet and the profile it detected. The totals update live. Uncertain ingredients show up as Read “X” · Which one is it? with options to choose from; unrecognized ones, as Not recognized · Replace or create. You can change amounts, add ingredients or tap “Scan again”.
- Tap Save, choose How will you serve it? and the recipe goes into your Recipe book.
For a good scan
- Good light and no shadows on the paper.
- Ingredients and amounts clearly visible.
- One recipe per photo.
- Legible printed or handwritten text.
The app decides whether it's ice cream or sorbet from what the recipe says and from its ingredients (cream, milk, egg yolk or cheese point to ice cream), and marks the profile that fits best. You can change both before saving.
On the free plan you get 3 scans; they only count when you save the recipe. With PRO they're unlimited.
5. Your recipe book
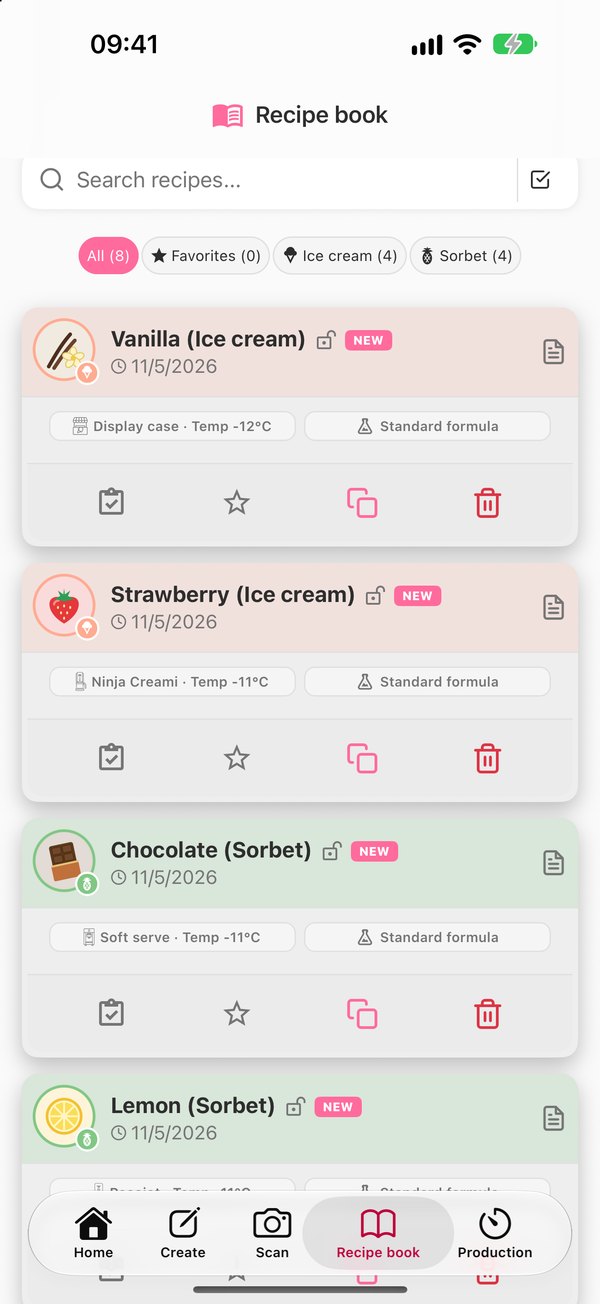
All your recipes, with the one you last created or edited always at the top. Use the search bar and the All, Favorites, Ice cream and Sorbet filters.
The recipe card
- Flavor icon: a drawing of its flavor (vanilla, strawberry, pistachio…) inside an orange ring (ice cream) or a green ring (sorbet), with a cone or a pineapple in the corner. With two flavors (“Fig and walnut”) you'll see both. If the flavor isn't recognized, you'll see just the cone or the pineapple.
- Lock: tap it to lock the recipe so it can't be deleted by mistake.
- NEW / EDITED: badges that disappear once you open the recipe.
- How it's served and Temp: the icon and name of the serving method (display case, freezer, Pacojet, Ninja Creami or soft serve) with its serving temperature; for example, “Ninja Creami · Temp −11 °C” (12 °F if the app shows Fahrenheit).
- How the recipe was created:
- Standard formula: generated by the Ice Cream Master.
- Manual formula: created by you from scratch or from a base (including the ones you open with the QR code on a technical sheet).
- Scanned: read from a photo with the scanner.
- Imported: received as an .icr file.
- Production bar: if the recipe is in production, you'll see the stage, the countdown and the time it ends.
- Buttons: Production control, favorite, duplicate and delete. The document icon opens the recipe page.
Selecting several recipes
Tap the checkbox icon next to the search bar to select several recipes (“All” / “None”) and duplicate, share (as text) or delete them all at once. Locked recipes aren't deleted.
6. The recipe page
When you open a recipe, you land on its page: all its technical data, the balance and the tools to produce it.
Header
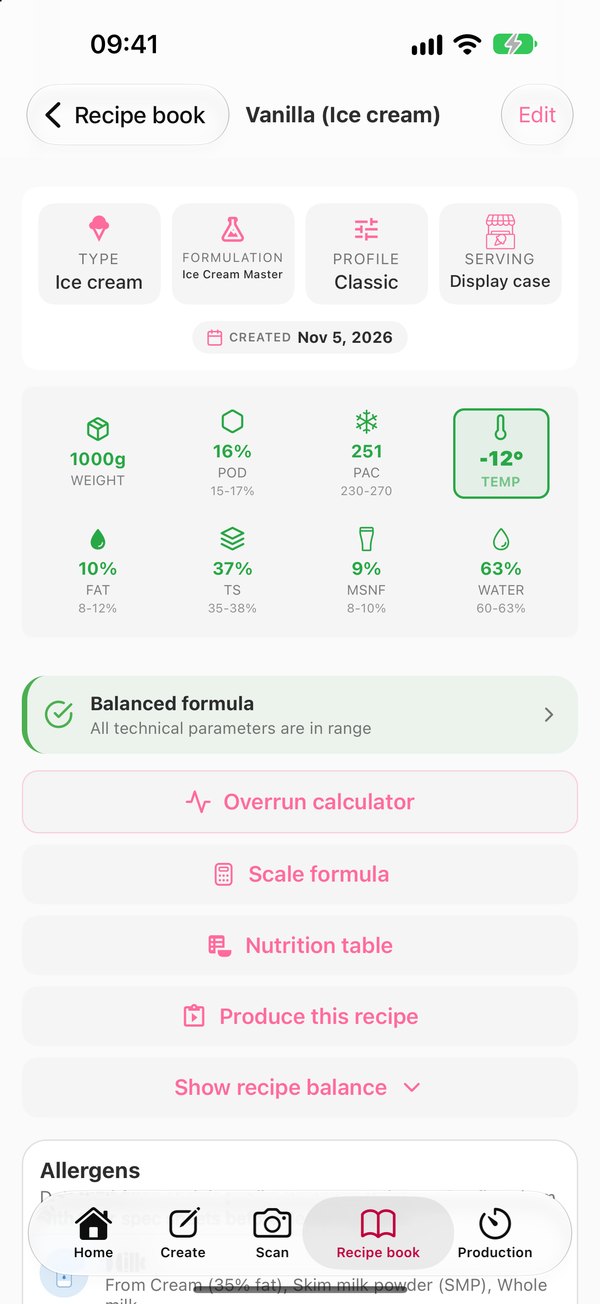
Boxes with the Type (Ice cream or Sorbet), the Formulation (Ice Cream Master, Manual, Scanned or Imported), the Profile and the Serving method (how it's served). Tap them to see what they mean. Below, the dates it was created and last modified.
A recipe that shows Standard formula on its recipe book card shows Ice Cream Master on its page: both mean the Ice Cream Master generated it.
In Ninja Creami and Pacojet recipes, below that you'll see how many grams of mix fit in your pint or beaker, with the link “Calculate for my Ninja” or “Calculate by beaker”, which opens Scale formula with one already set.
Totals and suggestions
The same totals box as in the editor and, below it, the Master's summary: “Balanced formula”, “N important suggestions” or “N critical suggestions”. Tap it to see the suggestions, with their suggested adjustments and the Undo and Redo buttons.
Tools
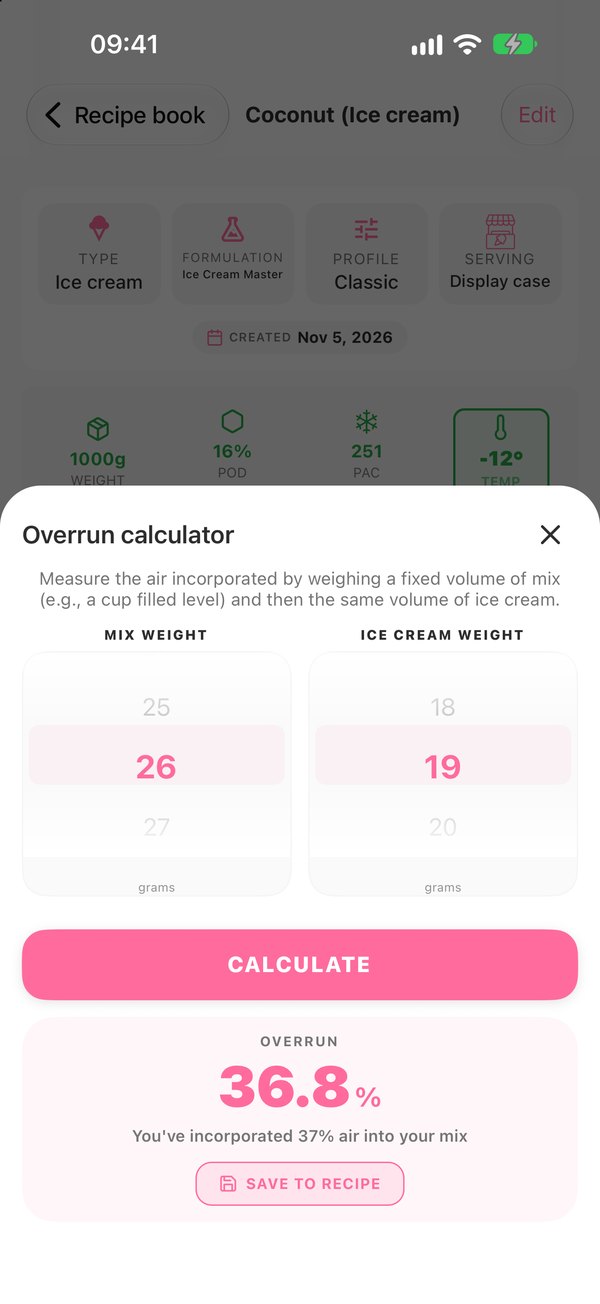
- Overrun calculator: weigh the same volume of mix and of finished ice cream and the app calculates the air incorporated (artisan ice cream is usually between 30 and 40%). Tap “Save to recipe” to keep a history by batch.
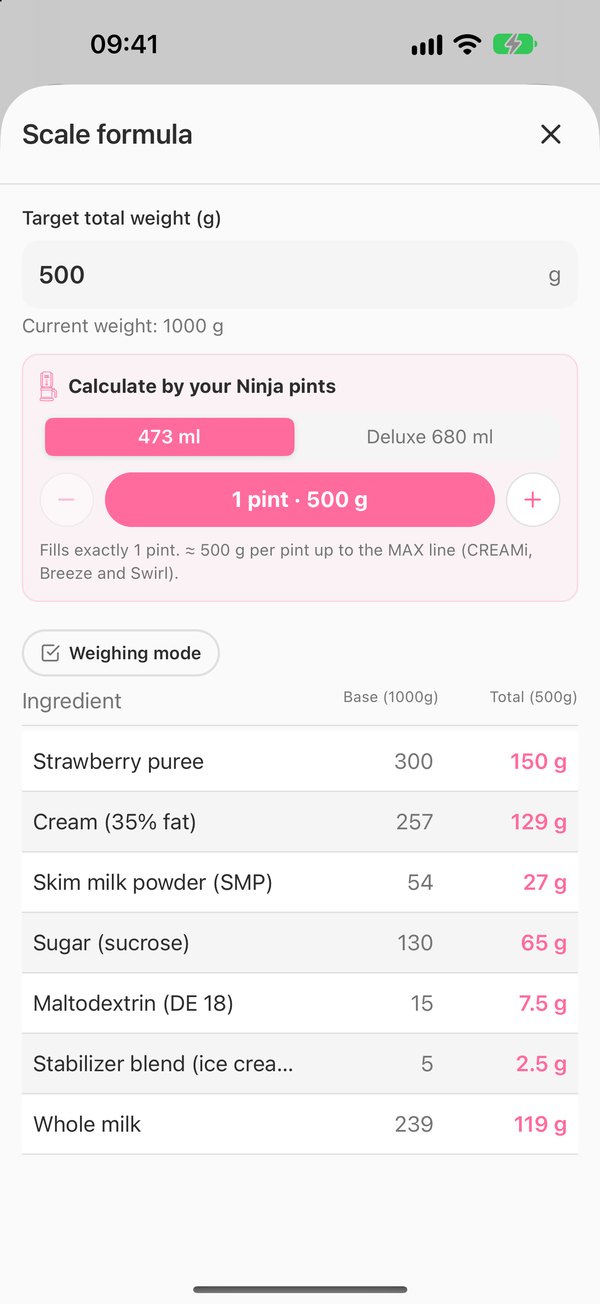
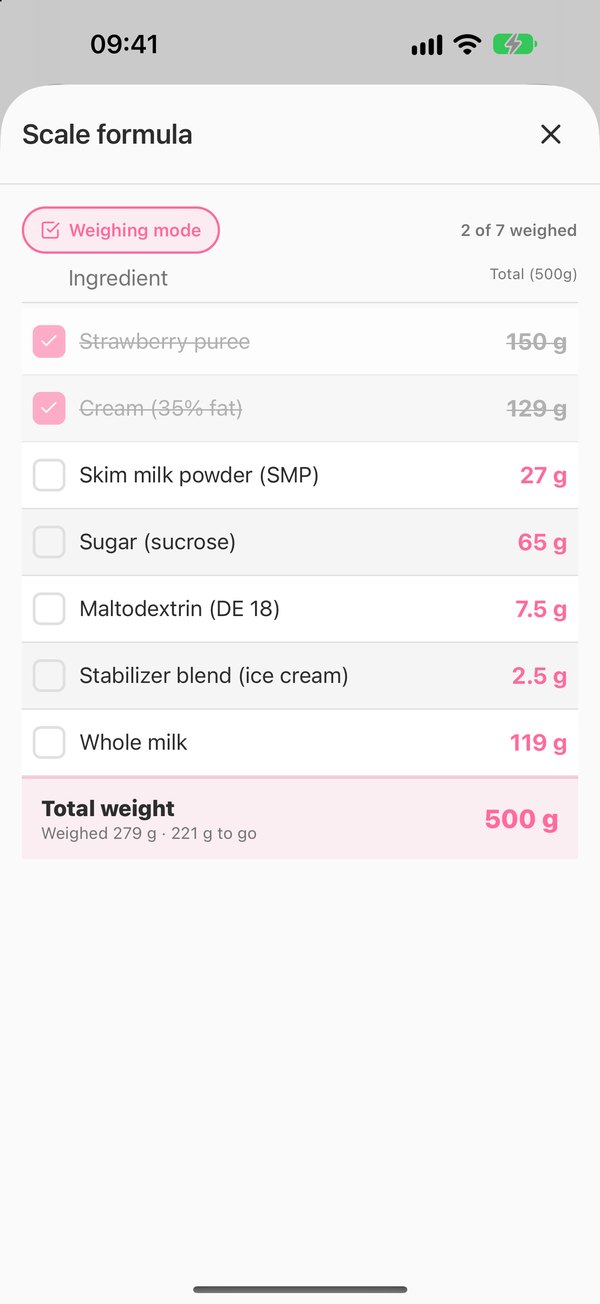
- Scale formula: type the total weight you want or use x2, x3, x4 or x5, and the app recalculates every ingredient. In Ninja Creami and Pacojet recipes, instead of x2–x5 you calculate by pint or beaker with − and +: the 473 ml (16 oz) pint for the CREAMi, Breeze and Swirl (about 500 g), the 680 ml (24 oz) Deluxe pint (about 740 g) or the Pacojet beaker (about 870 g). The app remembers your Ninja and tells you whether you fill it exactly or how much is left over. It includes a Weighing mode, which hides the target weight so the whole list fits on screen.
- Nutrition table for the recipe: per 100 g and, if you like, for two portions you can rename (Scoop and Pan by default). Share it as a nutrition table, a full label or an A4 sheet, in PNG or PDF. Under Label format, choose European Union or US (Nutrition Facts): the US option draws an FDA-style Nutrition Facts panel, in English and per serving, with FDA rounding and % Daily Values. It starts in the format of your seasonal calendar's country (Nutrition Facts for the United States) and then remembers your choice. The values are estimates calculated from the ingredients: check them against your suppliers' spec sheets or a lab analysis before you sell.
- Produce this recipe: opens Production control (see Production).
- Show recipe balance.
Recipe balance
Two views, chosen at the top right:
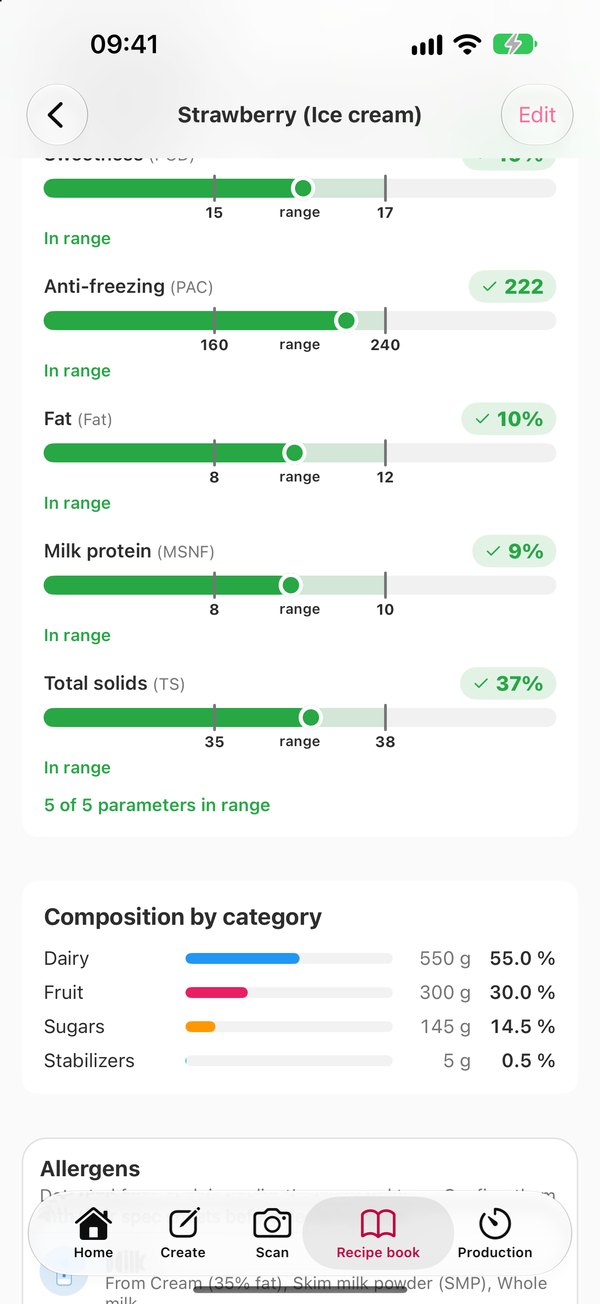
- Bars: each parameter fills with an animated bar up to its value. The profile's range is marked with its limits. The bar is green when it's in range, amber when it's close to the edge and red when it's out of range, and below it tells you it's “In range” or what to fix (for example, “Will be hard at that temperature”).
- Radar: all the parameters at once; if the line stays inside the green band on every axis, the recipe is balanced.
At the bottom you'll see “N of N parameters in range” and, inside the balance, the Composition by category (dairy, sugars, fruit…) in grams and percent.
Allergens, ingredients and notes
- Allergens detected from each ingredient's name and type. Always confirm them with your suppliers' spec sheets.
- Ingredients as a table (amount, POD, PAC, Fat, TS, water), shown in full on the free plan too. Weighing mode shows them one at a time, with the amount in large type and a checkbox to tick off as you weigh. At the end, the mix's total weight, what you've weighed so far and what's left.
- Description and My notes.
Actions
At the bottom of the page:
- Share: image, text, .icr file or PDF technical sheet (see Share).
- Edit: opens the recipe in the editor.
- Duplicate: creates “Name (Copy)” and takes you back to the recipe book.
- Variation: creates “Name v2”, “v3”… and opens it in the editor so you can keep testing.
7. Production and Workshop
Keep track of every batch, from pasteurization to churning, with timers and alerts.

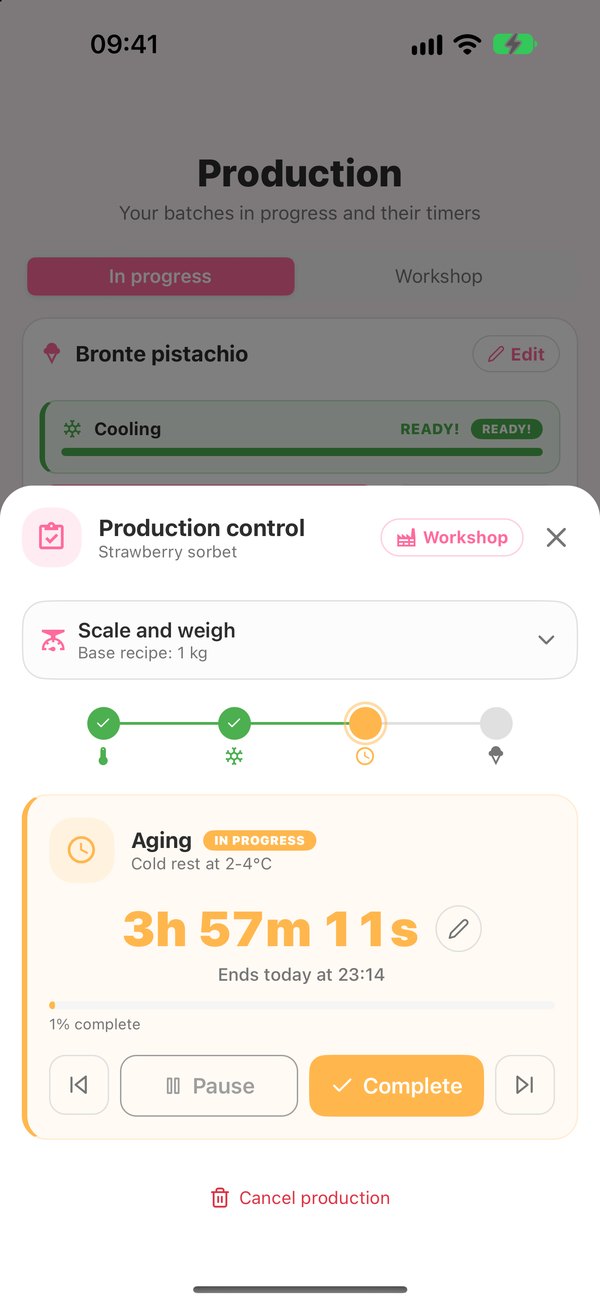
Starting a production
- From the Production tab (“Start production”, or “Add new production” if one is already running), from “Produce this recipe” on the recipe page or from the clipboard icon on its card in the Recipe book.
- In “Scale and weigh”, enter how much mix you're going to make (for Ninja Creami and Pacojet recipes, also by pint or beaker).
- Check the stages and set how long each one lasts with − and + (hold to go faster, or tap the number to type it) or with the quick times.
- Tap Create and then Start.
| Stage | Ice cream | Sorbet |
|---|---|---|
| ● Pasteurization | 5 min | 3 min |
| ● Cooling | 90 min | 60 min |
| ● Aging | 8 h | 4 h |
| ● Churning | 15 min | 15 min |
These are the default times; you can change them. With Pacojet or Ninja Creami, aging becomes Freezing (24 h) and churning becomes Pacotizing or Ninja processing.
During production
- A timeline with the current stage, the time left and the percentage complete. Tap the pencil to change the time remaining.
- Buttons to Pause, Resume, Complete or skip a stage. The Production tab has shortcuts: Pause, +5 min, Next.
- When each stage ends, you'll see “Stage complete!” and the option to start the next one or leave it for later.
The Workshop
In the Production tab, the Workshop selector opens a 3D model of an ice cream workshop: the shelf and the fridge together, the weighing table and the worktable side by side, the vertical pasteurizer, the batch freezer (or Pacojet or Ninja Creami), the blast freezer, the storage freezer and the display case. Choose a recipe and follow the process step by step: weigh the ingredients, pour, pasteurize, load the machine, extract the ice cream, run it through the blast freezer and store it. If you have a production running, the Workshop shows it in real time (you can switch between your productions at the top); with “Sandbox mode” you can practice without affecting your productions.
- Start automatic production: a button that's always in view. The workshop does each step by itself, and you can stop it whenever you like. The camera follows the production, manual or automatic.
- Tap a piece of equipment or an ingredient to see its actions. You choose the quantity before confirming.
- The fridge holds dairy and fresh ingredients, and purees thaw in it. The shelf has five levels; the bottom one holds no food.
- Getting around: use the joystick, and the + and − buttons to zoom in. The All, Prep, Production and Sales filters show each area, and under “Equipment” you can move the equipment or go back to the original layout.
- Whatever you store in the freezer and the display case stays there even if you close the app. To empty them, tap the machine.
- Sound and vibration: turn them off under Appearance or with the speaker button.
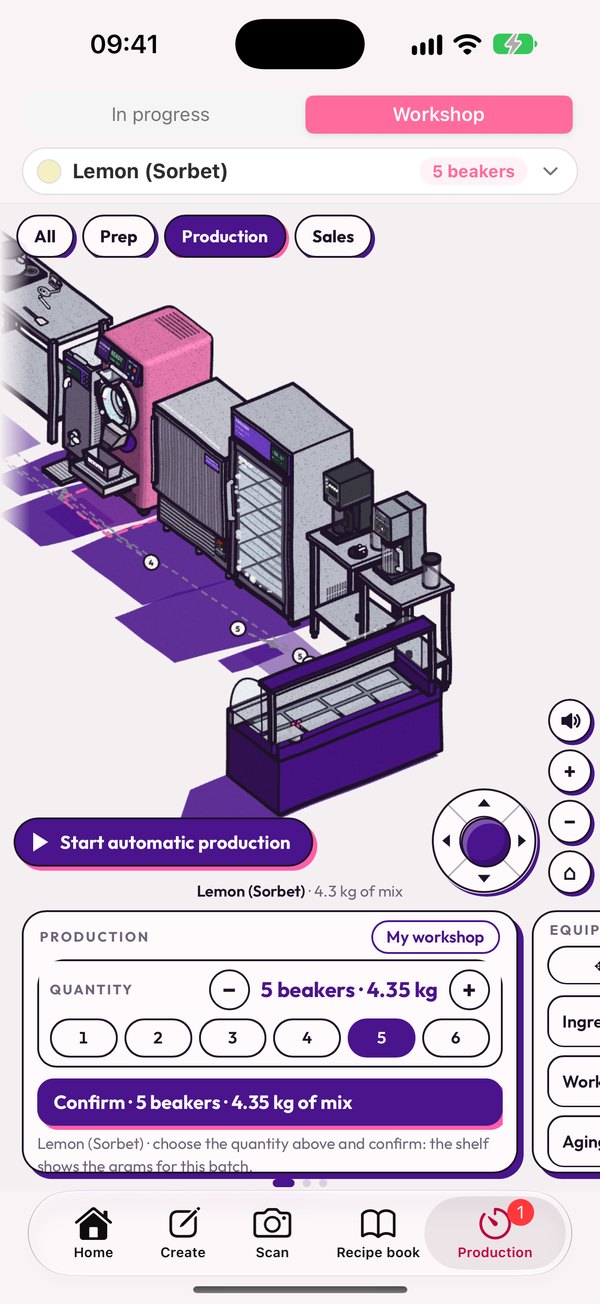
The Workshop.
8. My ingredients
More than 480 ingredients, each with its spec sheet: dairy, sugars, fruit and purees, nuts, chocolate, stabilizers, liqueurs, herbs, spices… Open it from the Ingredients card on Home.
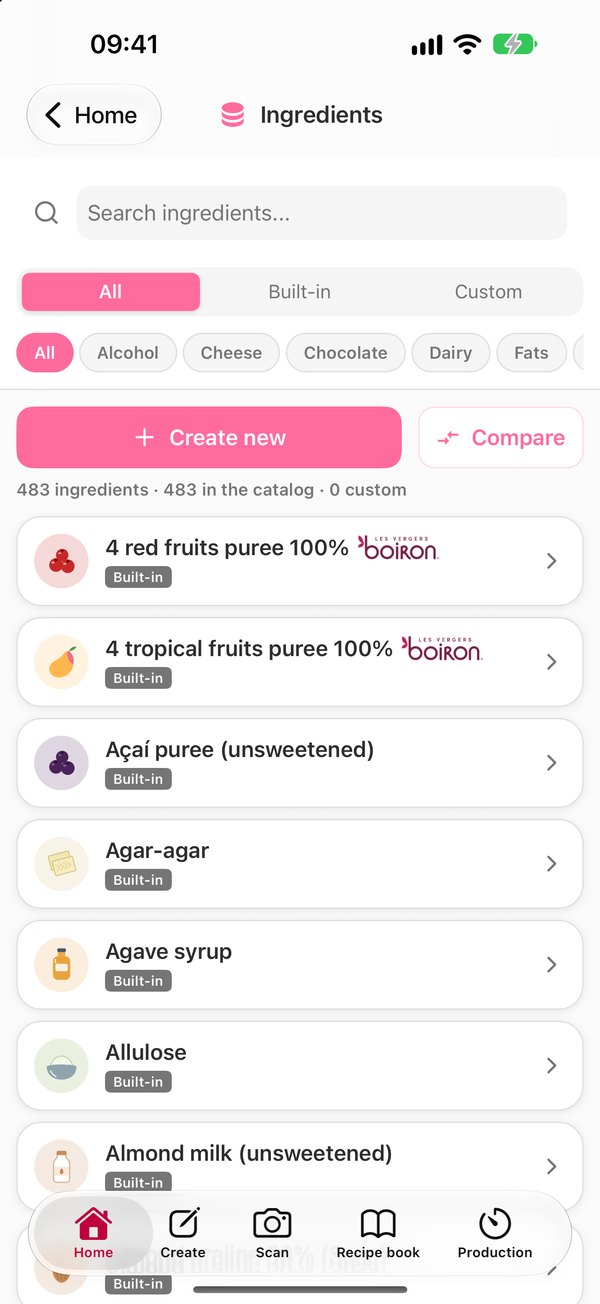
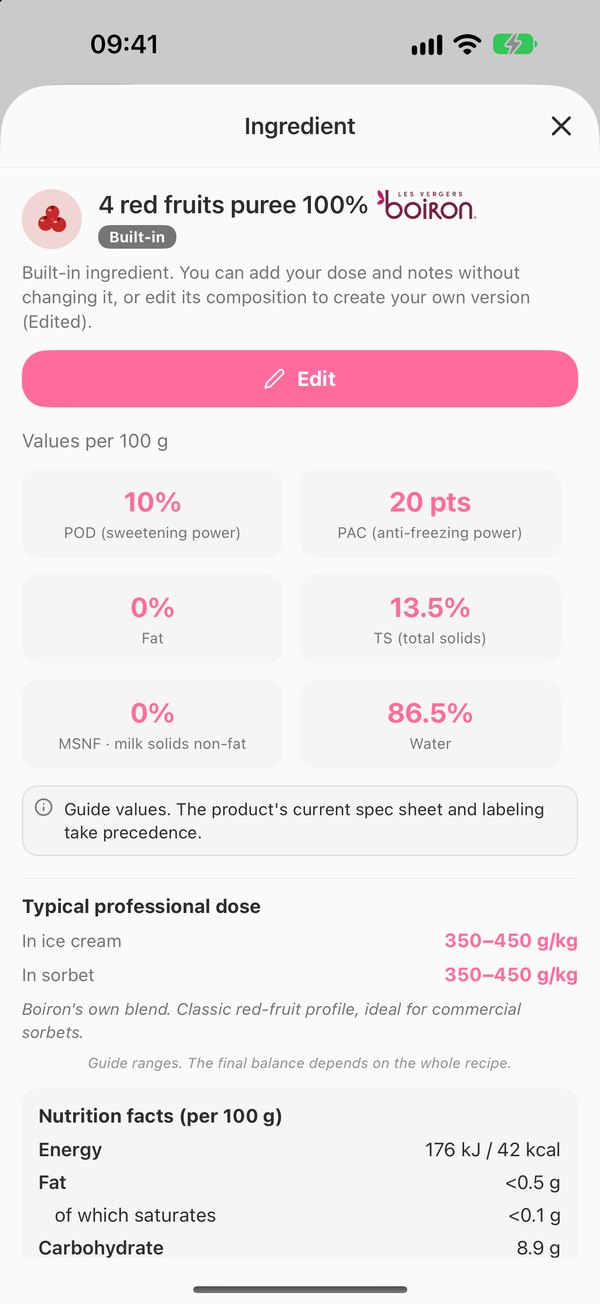
- Search and the All / Built-in / Custom filters, plus chips by category.
- Each ingredient has an icon for its family and a tag: Built-in, Custom (created by you) or Edited (a built-in ingredient you've modified). You can hide the icons in Settings › Appearance.
- Branded products: professional fruit purees and specialties show their brand's logo in the list, on their page and when you add them to a recipe.
- Press and hold an ingredient to view or edit it, duplicate it, compare it with another one and, if it's yours, share or delete it.
- Compare: put two or three ingredients side by side and see how much of one equals another.
- Below the buttons, a counter: how many ingredients there are, how many come from the catalog and how many are custom.
The ingredient page
- Values per 100 g: POD, PAC, Fat, TS and MSNF. For branded products they're guide values: the product's current spec sheet and labeling take precedence.
- Spec sheet from the manufacturer or from official tables when available (allergens, preparation, storage and source).
- Typical professional dose in ice cream and in sorbet, with its technical max.
- Effects on the recipe: what it brings, what happens if you use too much and what happens if you use too little.
- Nutrition facts and Your notes.
Creating an ingredient
Tap Create new and choose:
- Create manually: name, POD, PAC, Fat, TS, MSNF, water and category. If you're missing a value, you can still save: it's kept as unknown, not as zero.
- Nutrition label converter: enter the values from the label (fat, saturated fat, carbohydrates, sugars, fiber, protein and salt per 100 g) and tap “Convert”: the app estimates the technical parameters. A US Nutrition Facts label is per serving and lists sodium: scale the values to 100 g first, and for salt use sodium × 2.5.
On the free plan you can have 2 custom ingredients, and changing the composition of a built-in ingredient is PRO (you can still edit its dose and notes). You can rename your custom ingredients on the free plan too: the recipes that use them update automatically.
9. Share and import

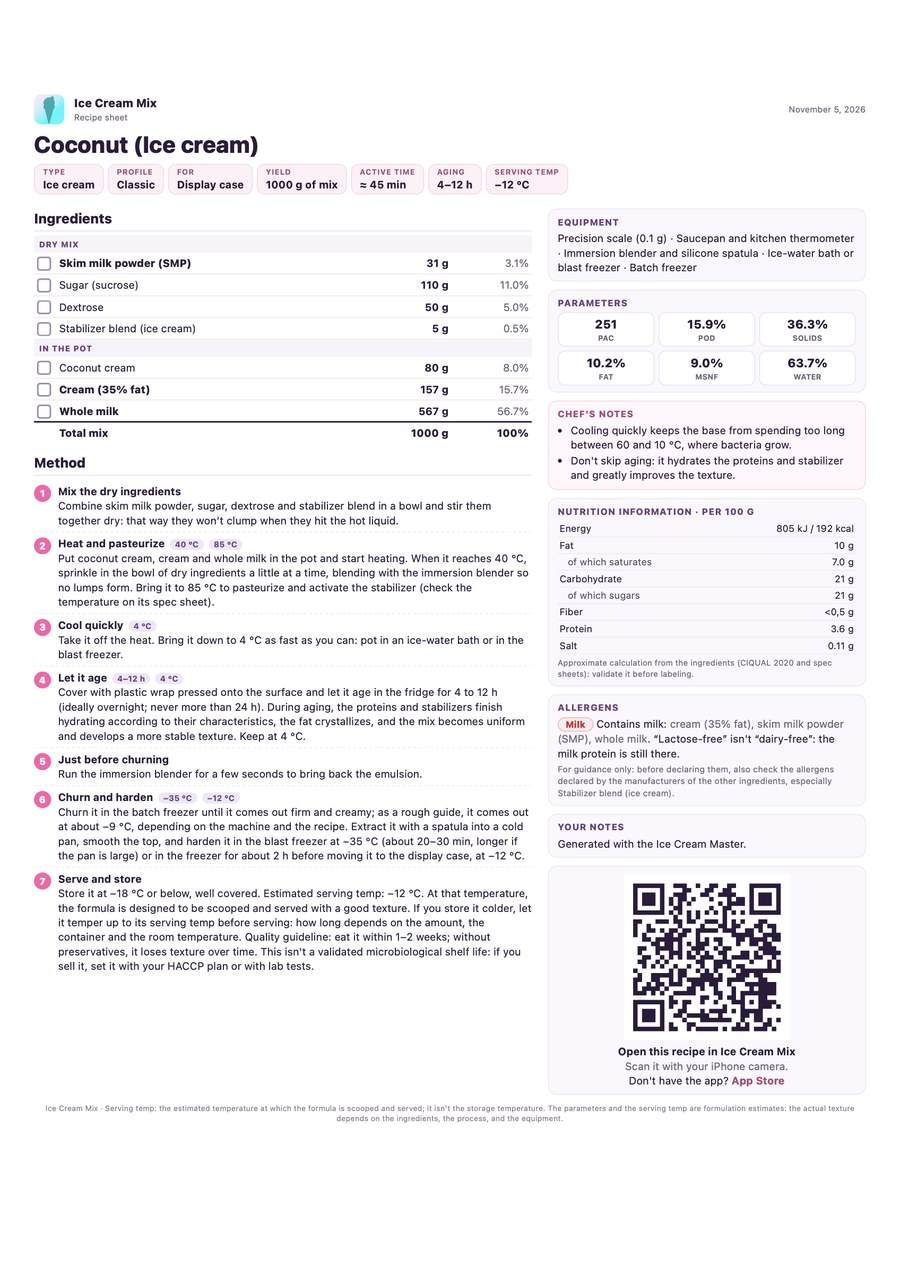
On the recipe page, Share gives you:
- Image: the chart and the ingredient list in a single image.
- Copy text: the detailed formula, copied to the clipboard.
- Export recipe (.icr): a compact file for another app user. It includes your custom ingredients so the recipe adds up on their iPhone.
- Technical sheet (PDF): a printable sheet for production.
The PDF technical sheet
- A header with your logo and your business details (set them up in Settings › Business details).
- Type, profile, yield, aging and serving temperature (in °C or °F, following Settings › Temperature).
- Ingredients grouped by when they go in (dry mix, in the pot, while cooling, when churning…), each with a checkbox, grams and percentage.
- Step-by-step method, equipment, parameters, nutrition information, allergens and notes.
- A QR code: scan it with the iPhone camera and the recipe opens in Ice Cream Mix, ready to import.
Importing a recipe
Tap an .icr file (in WhatsApp, Mail, Files, AirDrop…) or scan the QR code on a technical sheet. Import recipe opens full screen: review it, adjust it if you want and tap Save. If the recipe doesn't say how it's served, the app asks you. When you're done, its recipe page opens.
Ingredient packs (.icring)
In Ingredients › Custom, Share lets you choose which custom ingredients to send in an .icring pack. When you receive one, you see the list with their parameters and add them to your ingredients; any you already have with the same name are updated.
10. Master suggestions
The Master reviews your recipe with every change and flags what's worth fixing before you churn. You'll find it in the editor (the side tab with the hat) and on the recipe page (the card below the totals).
What it checks
- POD, PAC, solids, fat and MSNF outside their range (PAC according to the serving method), and when a value is just close to the edge.
- The main flavor: whether its ingredient is too little or too much (for chocolate, based on the cocoa).
- Each ingredient's dose against its professional range, and the ones that don't belong in sorbet.
- Too much water in sorbet, the risk of a sandy texture from too much MSNF, and the balance between MSNF and fat.
- Sugars: whether dextrose dominates, whether sucrose is the only sugar, or whether there's too much inulin.
- No stabilizer, or too much fruit, alcohol, salt or liquid oil.
- Soft-serve recipes and, for recipes from the Master, whether the temperature has drifted from the one you asked for.
How they're shown
- 🔴 Worth checking: the most important.
- 🟡 Suggestions: out of range, worth fixing.
- 🔵 Technical notes: background information (dose in range, and so on).
- Balanced formula: when everything is in range.
Whenever it can, each suggestion comes with a suggested adjustment that's already calculated, with the “Try this adjustment” button. It's a suggestion, not the absolute truth: an adjustment can move other parameters, so check the result and use Undo if you don't like it. If no single change will fix it, the Master tells you.
11. Settings
Tap the gear at the top right of Home.
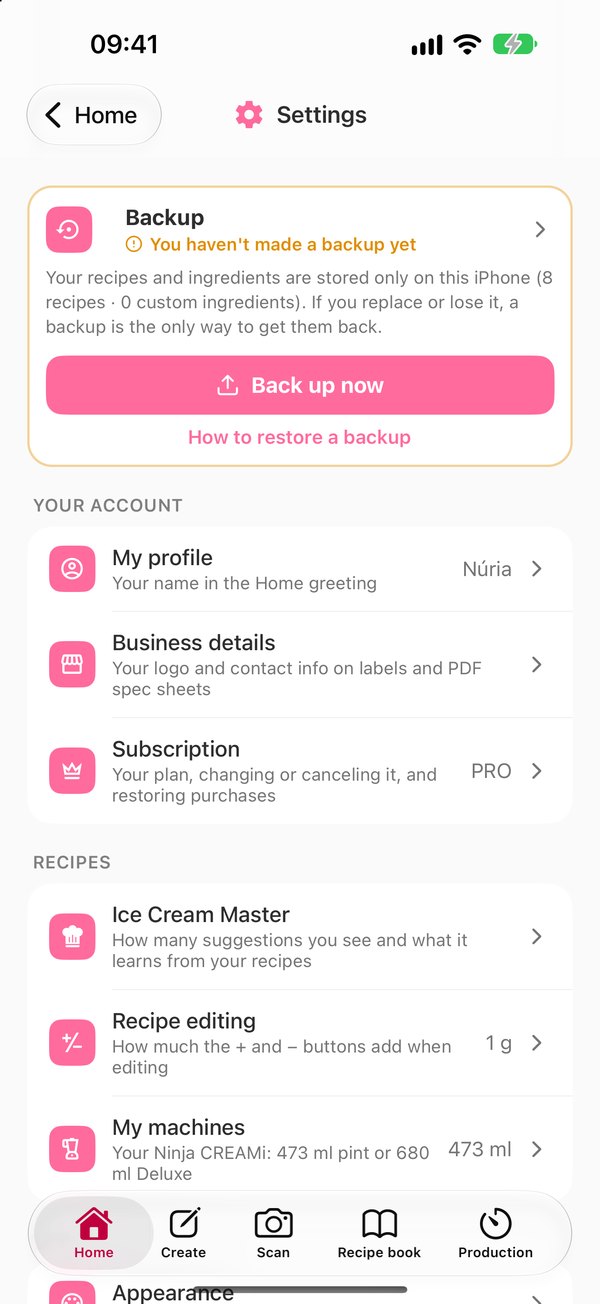
Backup
It's right at the top. The card tells you when you made your last backup (in amber if you haven't made one yet or it's been more than 30 days) and how many recipes and ingredients are stored. With PRO, Back up now exports your data to a file, and How to restore a backup explains how to get it back: just open that file with Ice Cream Mix.
Your account
- My profile: your name in the Home greeting.
- Business details: your logo and contact info on labels and PDF sheets.
- Subscription: your plan, changing or canceling it (opens Apple's subscriptions sheet) and restoring purchases.
Recipes
- Ice Cream Master: how many suggestions you see and what it learns from your recipes, with the option to reset its style.
- Recipe editing: how much the + and − buttons add when editing (1 g, 5 g or another value).
- My machines: your Ninja CREAMi, with the 473 ml pint or the 680 ml Deluxe, to calculate by pint.
App
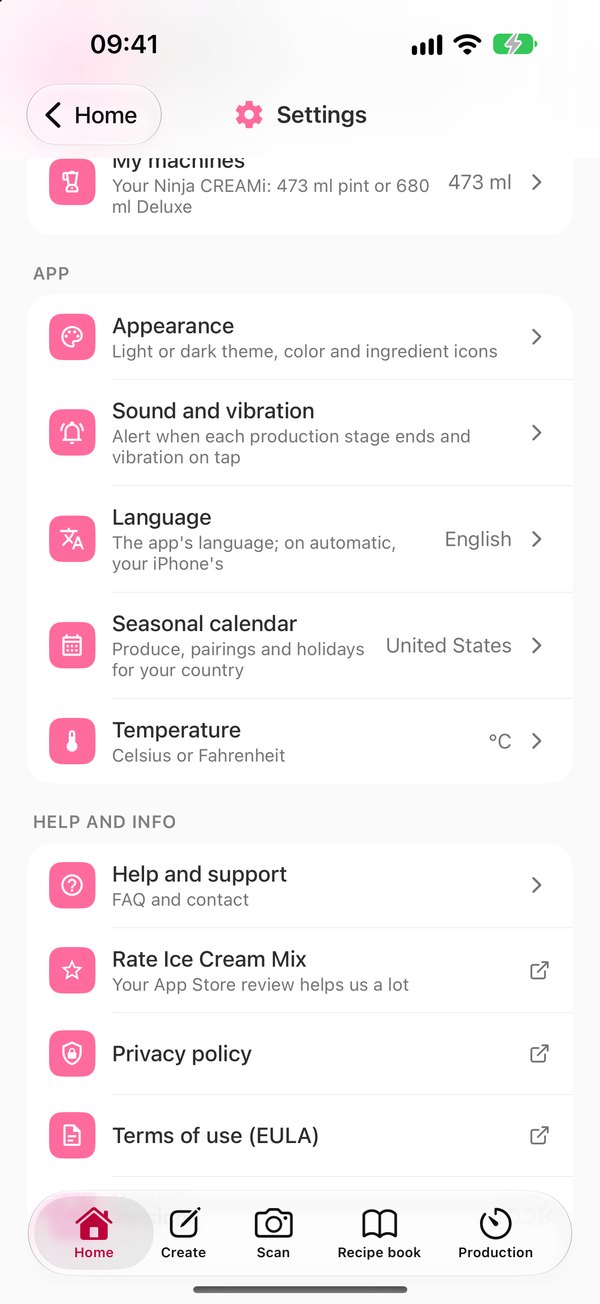
- Appearance: light or dark theme, accent color and ingredient icons.
- Sound and vibration: the alert when each production stage ends (a chime, other sounds or a voice) and how strong the vibration is.
- Language: the app's language. On Automatic, it uses your iPhone's language; if you pick one, the app and its system alerts appear in that language.
- Seasonal calendar: the produce, pairings and holidays for your country. On Automatic, it follows your iPhone's region (if there's no calendar for your country yet, it uses the one for the app's language: United States for English). You can pick another country.
- Temperature: Celsius (°C) or Fahrenheit (°F). On Automatic, °F if your iPhone is set to the United States and °C everywhere else. The app always calculates in °C; this only changes how temperatures are shown (recipe pages, method, alerts and PDFs).
When you change Language, Seasonal calendar or Temperature, Ice Cream Mix offers to restart so the change applies right away. Choose Later and it applies the next time you open the app.
Help and info
Help and support (FAQ and contact), Rate Ice Cream Mix, the privacy policy, the terms of use and the app version.
12. Free plan and PRO
Ice Cream Mix has a free plan so you can try it out thoroughly, and the PRO plan, with no limits.
| Feature | Free | PRO |
|---|---|---|
| Recipes from scratch (including imports, duplicates and variations) | 3 total | Unlimited |
| Ice Cream Master recipes | 3 total | Unlimited |
| Recipe scans | 3 total | Unlimited |
| Edits per recipe | 5 | Unlimited |
| Technical values and nutrition information for all 480+ ingredients | 50 lookups | Included |
| Custom ingredients (their values are always visible) | 2 total | Unlimited |
| Changing the composition of a built-in ingredient | — | Yes |
| Share recipes (.icr) | 2 total | Unlimited |
| Share ingredients (.icring) | 2 per share | Unlimited |
| Backup | — | Yes |
| PDF technical sheet, balance, production and Workshop | Yes | Yes |
You can go PRO from inside the app (“GO PRO” on Home, or Settings › Subscription). There are Weekly, Monthly and Annual plans. The PRO screen tells you why it opened (for example, how many free recipes you have left) and shows the annual price per month. The annual plan includes free trial days: the screen tells you how many and what you'll be charged afterward, and if you cancel before the trial ends, you pay nothing. As soon as you subscribe, PRO turns on.
To change plans or cancel, go to Settings › Subscription › Manage subscription (or to your Apple Account settings). If you cancel, you keep PRO until the end of the period you've paid for. If you switch to a new iPhone, use “Restore purchases”.
Manual updated November 2026.